Mounting a Small Preamp to your Tailpiece
A number of players, especially the very active Rockabilly bassists, have elected to mount their preamplifier on their bass (K&K Pure Preamp, Dual Channel Pro/Pro ST, Bass Master Pro/Rockabilly, Golden Trinity Bass systems). This can be appropriate for a number of players for a lot of different reasons. As a result, I've documented the setup I did for a friend, and I've also had special cables built for your convenience, since I have not been able to find a commercially available one-foot stereo cable with angled TRS connectors.
Mounting Kit Available for your convenience:
I've published this page for several years in order to assist players to acheive a low-profile pickup installation, but some customers have told me that they had a bit of trouble sourcing the appropriate materials. To make things even easier, I've assembled a "kit" to aid you in this process. The kit includes:
Some players prefer to mount their preamps behind their bass' tailpiece, so it can remain on the bass and still fit in the case (Power Pack, Pure Preamp, Dual Channel Pro/Pro ST, Bass Master Pro/Rockabilly, Golden Trinity Bass systems). I've written out the following instructions, with photographs, as a suggestion for an easy method for mounting a preamp. If this is something you'd like to do, this information may give you your own ideas for placing your preamp in a more convenient location. Please understand why I used the bright colors for these photos—I would recommend the use of dark gray or black foam and a black or other color Velcro strip to make the installation less obvious. I used these colors to make the components more visible in the photographs.
You will find the special cables I had built available for sale at the bottom of the page, as well as on individual product pages.
 New! Get a kit which contains everything you need to mount your compact K&K preamp to your tailpiece—without any modifications to your valuable instrument! Consisting of high-quality components, this kit includes complete, illustrated instructions and can be applied by most people in less than 15 minutes. The included cables use top quality materials. Links to the page where the mount kits can be purchased are below, under "Product Associated With This FAQ."

 Get the stereo version if you have a preamp with two-channel input on a single jack (like the Rockabilly System or Bass Master Pro). If you're not sure which one you need, ask me!
Get the Mounting Kits Here!
Mounting Kit Available for your convenience:
I've published this page for several years in order to assist players to acheive a low-profile pickup installation, but some customers have told me that they had a bit of trouble sourcing the appropriate materials. To make things even easier, I've assembled a "kit" to aid you in this process. The kit includes:
- A high-quality 12" cable (mono or stereo available)
- A dark-colored, dual-surface hook-and-loop strap
- A piece of charcoal-colored, vibration-deadening foam
- Complete, illustrated instructions

This photograph is the final one in the series below that gives you some ideas on how to mount your preamp on the back of your tailpiece. The brightly colored velcro strip and foam were used for clearest illustration; I ordinarily use gray.
|
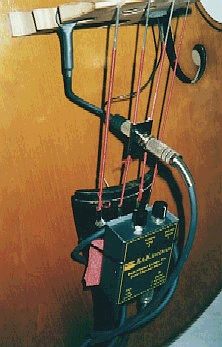 This photo shows Pleun Vermeulen's Bass Master Rockabilly system installation; he chooses to mount the very light preamp to the outside his tailpiece. |
Some players prefer to mount their preamps behind their bass' tailpiece, so it can remain on the bass and still fit in the case (Power Pack, Pure Preamp, Dual Channel Pro/Pro ST, Bass Master Pro/Rockabilly, Golden Trinity Bass systems). I've written out the following instructions, with photographs, as a suggestion for an easy method for mounting a preamp. If this is something you'd like to do, this information may give you your own ideas for placing your preamp in a more convenient location. Please understand why I used the bright colors for these photos—I would recommend the use of dark gray or black foam and a black or other color Velcro strip to make the installation less obvious. I used these colors to make the components more visible in the photographs.
You will find the special cables I had built available for sale at the bottom of the page, as well as on individual product pages.
|

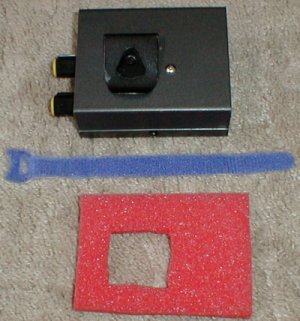


Deluxe Preamp Mounting Kit
New! Get a kit which contains everything you need to mount your compact K&K preamp to your tailpiece—without any modifications to your valuable instrument! Consisting of high-quality components, this kit includes complete, illustrated instructions and can be applied by most people in less than 15 minutes. The included cables use top quality materials. Links to the page where the mount kits can be purchased are below, under "Product Associated With This FAQ."Get the Mounting Kits Here!